My experience of learning Android development - Specialmoves

Developing for Android
Specialmoves Labs
For the past month, we’ve been building an Android app. Last year I looked into Android development, but I didn't actually finishing building an app, so this R&D project has been a great opportunity to pick it up again. Coming from a front-end perspective, I’ll take you through what it’s been like to work with Android and what you can expect as a new Android developer.
Getting started
Before you start developing Android apps, you need to set up the development environment. Eclipse is the recommended IDE to use, but it's possible to use others. I found it quite confusing to get everything I needed installed and set up properly. There are three pages in the developer guide that explain how to do it. I'm sure you'll figure it out in the end, but I wish it was as simple as just getting one download that took care of everything for you. Once it's all up and running though it works really well.
Android applications are built in Java and uses XML for certain resources. I didn't find Java too hard to pick up, it's been around for more than 15 years so there's a lot of information to find about it, and the Android documentation will give you much of what you need to know at first.
Layouts
One of the first things you find out about when you start learning Android is layouts. Android layouts are written in XML, and are, as the name suggests, what you see on screen. A layout normally consists of different child views. A view is basically anything that can appear on screen; a button, some text, an image and so on. It’s similar to HTML in how you structure and nest the views.
If you're already familiar with any mark-up language, it’s easy to get started building layouts in XML. The hardest part is deciding which layout type to use, because there are several different types available and they all display and order their child views differently. I spent quite a lot of time reading about layouts in the Android Dev Guide and trying to get an understanding of how the different layouts work and in what situations they’re best suited to.
While XML seems to be the way to go to create large layouts, it’s also worth noting that it is possible to create layouts and views in Java. Every view you have in XML represents a Java class, so when you want to create a custom view yourself, you can easily do so by extending one of the existing view classes.
Styles
Android also uses XML for things other than layouts; different types of resources, like strings, colours and more. The resource I used the most was definitely styles. A style is applied to a view similar to how a CSS class is applied to an HTML element. When you define a style in XML you give it a name that you use to reference it from a view, and then you define layout properties for it, like width, height, background, padding etc, a bit like how you'd define style properties for a CSS selector.
I'd recommend that anyone new to Android looks into creating XML styles, especially since I actually didn't discover them until halfway through the project. Now I use styles for pretty much every view, and it has saved me a lot of time and hassle.
Without styles my layouts were very long and messy looking. Here is an example of how I used to create two buttons that look the same, before I started using styles:
        <Button
    android:id="@+id/btn_submit"
    android:text="@string/submit"
    android:layout_width="wrap_content"
    android:layout_height="wrap_content"
    android:paddingTop="10dip"
    android:paddingLeft="15dip"
    android:paddingBottom="30dip"
    android:background="@drawable/my_button_background" />

<Button
    android:id="@+id/btn_cancel"
    android:text="@string/cancel"
    android:layout_width="wrap_content"
    android:layout_height="wrap_content"
    android:paddingTop="10dip"
    android:paddingLeft="15dip"
    android:paddingBottom="30dip"
    android:background="@drawable/my_button_background" />
Now, using a style I've created called MyButtonStyle, that same code would look like this:
        <Button
    android:id="@+id/btn_submit"
    android:text="@string/submit"
    style="@style/MyButtonStyle" />

<Button
    android:id="@+id/btn_cancel"
    android:text="@string/cancel"
    style="@style/MyButtonStyle" />
MyButtonStyle is defined together with other styles in a separate XML document called styles.xml:
        <style name="MyButtonStyle">
    <item name="android:layout_width">wrap_content</item>
    <item name="android:layout_height">wrap_content</item>
    <item name="android:paddingTop">10dip</item>
    <item name="android:paddingLeft">15dip</item>
    <item name="android:paddingBottom">30dip</item>
    <item name="android:background">@drawable/my_button_bg</item>
</style>
Using styles makes layouts much easier to handle since all the styling is done in another file, and, obviously, if the design changes I only need to update the code in one place; where the style is defined.
There is one thing though, that makes styles less useful than they could have been. You can't assign a style to a view in Java. It is possible to pass a style to a view programmatically, it just doesn't work when you do it. The style is just completely ignored unless it's coming from a view created in XML. There is actually a bug report on the issue, but no official reply to it, just a few more people with the same problem as me. If you really want to have a style applied to a view in Java, there are ways to work around it, but personally I don't think it's worth it, I'd rather just set all the style properties manually in code.
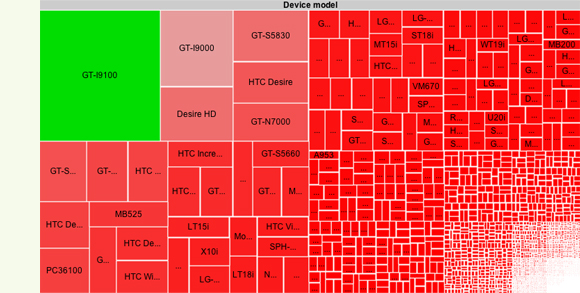
Fragmentation
If you've had even the smallest interest in Android development, you can't have avoided hearing about the issue of fragmentation, and I can see how it might seem a bit daunting when you see images like this one of the different Android devices that are out there (image credit http://opensignalmaps.com/reports/fragmentation.php):
There are a few different things to consider when it comes to supporting different devices. One is hardware power. Older devices will run things slower than newer ones, and some advanced applications, like some 3D games, won't work on lower end devices. This makes it important that you always try to optimise your code and not only test your app on new Android devices, but also the older ones.
I've also noticed that some apps out there simply don't work on certain devices, because the different manufacturers implement the OS differently. And when a new version of Android comes out, it's up to the manufacturer to upgrade their devices, and some take longer than others to do so. When they finally have the upgrade done, it's not certain all users will actually download it, though some devices will automatically download Android updates.
Other than those, I'd say there are three main things to consider for supporting as many devices as possible: different versions of the Android OS, physical screen size and screen density (images adapted from http://developer.android.com/resources/dashboard/platform-versions.html
& http://developer.android.com/resources/dashboard/screens.html):
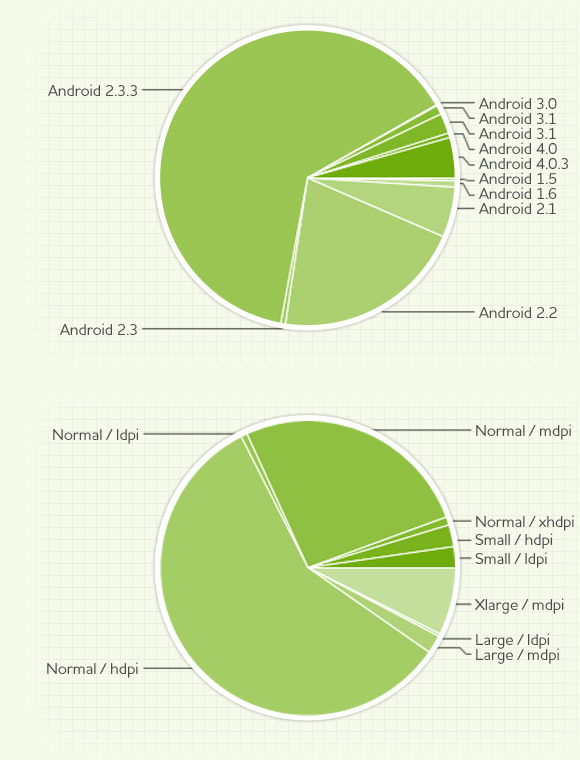
Each new version of Android introduces new things and better solutions to problems. What's quite annoying is you can't really start using all these new features, at least not if you want to support most Android users. 20% of the devices currently accessing Google Play uses Android 2.2 (Froyo) and 63% Android 2.3.3 (Gingerbread). When you read the documentation you'll often come across things that are only supported in newer versions of Android, and it can sometimes be hard to find the right information.
When it comes to screen sizes, Android does give you some help to make it as easy as possible to make your app work across devices with difference screen sizes and densities:
- You can save all image assets for different screen densities and the system will pick the correct one.
- You can do the same with layouts. So you can, for example, use different layouts for small and large screens, and Android will make sure the right one is used.
- When defining layout dimensions you can use density independent pixels (dip or dp) which automatically scale up or down depending on the density of the screen.
While dip can be really useful, I actually found myself using percentages (of the screen size) for the sizes and positions of my views. This made sense for this R&D project since the design team approached the design from an iOS point of view, and there was no plan for how the design would scale for different screen sizes. Because of that I thought it best if the app scaled up or down to simply just fit the screen.
Percentages worked very well, but I worry that using them for small buttons might make the buttons very small on a smaller screen, and therefore hard to press. When you're building an app for the public though, it has hopefully (or should have) been specifically designed for Android with its different perks and devices in mind. Then I'm sure there will be cases where dip is the best choice to use, and other when it's percentages or another unit.
Other differences from iOS to have in mind when creating an Android app include the hardware buttons that Android supports (back, settings, home and search), the settings menu (which is usually opened by pressing the hardware settings button) and Intents which I'll explain next.
Intents
The way the Android system works, it lets you use so-called Intents to start other applications or services from your app. This is a really useful feature that Android provides for you. One thing we used Intents for was sharing. Instead of getting into the SDKs for the different social networks, you can send an Intent to the Android system saying you want to share some text, an image or something else. The user then gets to choose between all the apps she has installed that handles sharing, like Twitter or Facebook, and that app will take care of actually sharing the content. This is a really simple solution that takes a couple of minutes to implement. Another example for what you can use Intents for is if you need a photo for your application, but you don't want to build the whole camera functionality yourself. You can use an Intent to easily start a camera app, let the user take a photo, and then get the photo returned to your app, where you can do whatever you want with it. This is done with only a few lines of code, the system takes care of the complicated bits, and you only need to listen for when the image is returned from the camera.
You can also register your own application to respond to certain Intents. If you were to build, for example, a Twitter app, you could register your app for the “share Intent”, and when another app sends out the Intent, your app will appear in the list of applications the user can open to share the content.
Conclusion
Overall I've had a really good experience with Android. I do really enjoy working with it, and will definitely continue to do so in the future. The issue of fragmentation is obviously always there, but I believe that if you consider the different platforms from the beginning, it's actually not that big a problem. It's just something you need to always keep in mind when you're working on layouts, but when it comes to actually coding things other than views, you don't really need to worry about it that much anymore.
---
Hanna Hollstrom is a Front-end/Interactive Developer at Specialmoves where she'll never complain about Flash Player fragmentation ever again.
Follow us on Twitter @specialmoves