The Beginning of Skynet with Arduino, AIR & Flash - Specialmoves

The Beginning of Skynet
with Arduino, AIR & Flash
Specialmoves Labs
Being in an industry of technology and innovation, I am always looking at new ways to create interactive systems that are fun but also useful. This project began when I first learnt about the Arduino, which is: "An open-source electronics prototyping platform based on flexible, easy-to-use hardware and software. It's intended for artists, designers, hobbyists, and anyone interested in creating interactive objects or environments.”
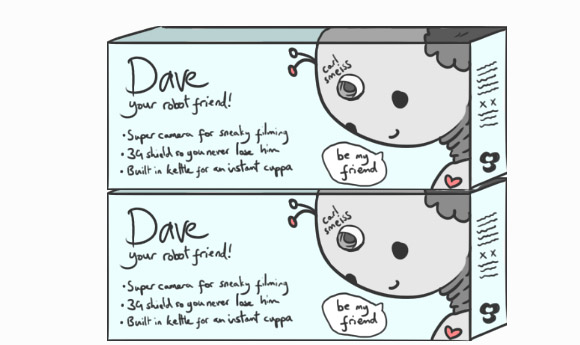
The Arduino opened up lots of opportunities and ideas for innovative interactive environments. The first one that came to my head was to do with robotics. As a kid we all wanted that robot friend ‘Dave’, and besides we all love robots and The Terminator so it was just a cool idea to build one.
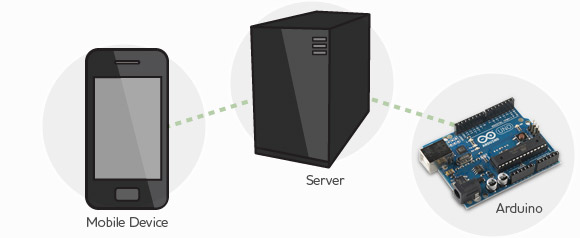
The first phase of research was to understand the Arduino and understand the ways we can communicate and interact with it through a network. I decided to build a system that allowed me to use a mobile device to control the Arduino.
The basic Arduino set up only allows you to communicate to a computer via the USB port, but it does allow us to add shields, which are add-on modules. The Ethernet Shield was ideal to quickly get the Arduino on to a network to communicate with the server.
I decided to build the base for ‘Dave’ first. I wanted 'Dave' to have wheels you could control so I decided to use a kit car as the base for ‘Dave’. I used a kit car because it had two Servos that controlled the steering and the motor that drives the car. The Servos were exposed and easy to access, so connecting to the Arduino was very easy.
How does it all work?
Communication
To create the communication between a Mobile device and the Arduino, I needed some form of server that listened for information and data from the Mobile device over a TCP connection.
I decided to build an AIR 3.2 Socket Server that ran on my laptop that listened for incoming TCP connections. I needed two connections, one from the Arduino and one from the Mobile device, so I used port 8080 for the Mobile and 8888 for the Arduino.
When both devices are connected, the server simply had to listen for data packages sent from the Mobile device on port 8080, then digest and forward the information to the Arduino on port 8888.
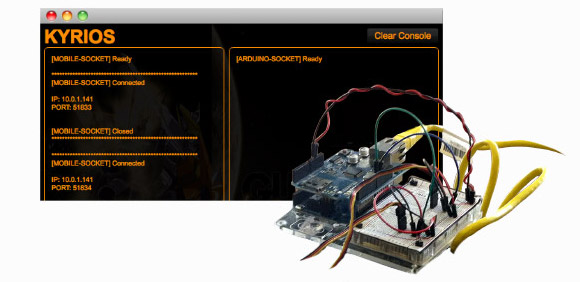
Wiring an Arduino
The Arduino kit came with many little components and tutorials that teach you how to wire certain components together and one of them was wiring a Servo. The Servo is wired to a pin on the Arduino which allows the Arduino to send data to the Servo through the specific pin. Once I had one Servo wired it was simple to copy the wiring and use a different pin on the Arduino.
Once I had it all wired up I attached the Ethernet Shield to the Arduino and connected the shield to a router. As I was running this on a local network I connected my Laptop and Mobile device to the same router, so the Arduino and Mobile device can see my Socket Server.
Coding an Arduino
The code is based in the C language and the Arduino comes with its own library. The tutorials also explain the code to communicate with components and how you send data to certain pins. To send data to a Servo, connected to a pin, you simply need to send an integer value between 0-180 which sets the position of the Servo.
        int pos = 0;

void test()
{
  	for(pos = 70; pos < 95; pos += 1)
 	{
    		_servo_Steer.write(pos);
    		delay(10);
	}

  	delay(5000);

  	for(pos = 95; pos>=45; pos-=1)
  	{
    		_servo_Steer.write(pos);
   		delay(10);
 	}

  	delay(5000);

  	_servo_Steer.write(70);
}
To connect to the server, I used the Ethernet Library tutorials to write the communication between the Arduino and the Socket Server. This allowed me to read data packages from the Socket Server and forward the values for the specified Servos.
        int type;
int val;

void loop()
{
	if(client.available())
  	{
    		type = client.read();
    		val = client.read();

    		if(type == SERVO_PIN9 )
    		{
    			_servo_Speed.write(val);
    		}
    		else if(type == SERVO_PIN8)
    		{
      			_servo_Steer.write(val);
    		}

    		Serial.flush();
  	}
}
Interact
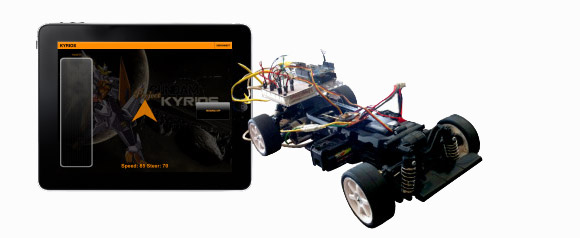
The final stage was to build a mobile app that can communicate with the Socket Server. I decided to build a quick Mobile Flex application for the Apple iPad 2.The application uses the accelerometer to control the steering Servo. The accelerometer tracks the rotation of the device in the X axis and calculates the angle the Servo should be pointing. To control the motor, I used touch gesture on a button, where the user can scroll up and down the button to control the speed of the motor.
What’s next?
The Arduino has opened up great opportunities for developers and innovators like me to build really cool interactive environments. Now I have the ability to control the Arduino using a mobile device, it’s time to take it to the next level and control it using a Wireless Shield, then we can control robot ‘Dave’ freely without it dragging a router around.
Then robot ‘Dave’ needs the ability to see, so we should give it a camera and post image data to the server and then to the mobile device, then we can see where robot ‘Dave’ travel whiles controlling it at out desk.
If ‘Dave’ wants to go shopping or play in the park, it can’t if it is always connected to a local router, so we need a 3G Shield that can communicate to a public Socket Server. With the 3G Shield you also get the GPS module, so we always know where it is, or where it has travelled.
Finally, we don’t want to control robot ‘Dave’ forever, we need it to just go and travel around freely, so let’s remove the mobile connection and use the server to tell robot ‘Dave’ what to do. Let it patrol the office and prod people to do their time sheets, abuse people that break the build, take our mugs back to the kitchen and maybe one day make us all a nice cup of tea.
---
Stephen Chan is a developer at specialmoves where he not-so-secretly plans on creating machines to conquer the world. @FatMan_Chan
Follow us on Twitter @specialmoves